I grew up in a home where almost every meal was made from scratch. In retrospect, I’m grateful for the delicious, healthy food I grew up eating, but at the time, I coveted my friends’ Fruit Roll-Ups, Capri-Sun and Happy Meals. Even though I wasn’t allowed to eat sugary cereals or drink most kinds of juice boxes, there were a few processed food items that inexplicably got a pass and were welcome in our kitchen.
In fact, with a fair degree of regularity my father would come home with a white and blue rectangular box in his hand, the cursive “Entenmann’s” logo comfortingly visible. After spotting the box, a wave of anticipation would follow. Was it crumb coffee cake? Donuts? Cheese Danish (please, no, not this time)? Was it a really good day? Did he get a raspberry Danish twist?
Maybe Entenmann’s got the junk food pass for its affordability (my father’s claim), or maybe it was because of its kosher dairy status. Price and kashrut may have been the reason my dad first bought an Entenmann’s cake, but it’s unlikely the sole reason we kept eating their pastries.

Entenmann’s was founded in 1898 in Brooklyn by a German immigrant. Later, the company moved to Long Island and expanded its business with a home delivery service. Frank Sinatra was even known to be a regular customer. In 1959, the Entenmann family notably invented the now ubiquitous see-through cake box. Since then, the company has been bought and sold by multiple large corporations, but continues to make similar products to this day.
The Nosher celebrates the traditions and recipes that have brought Jews together for centuries. Donate today to keep The Nosher's stories and recipes accessible to all.
As a kid, anything iced and sweet was A-OK by me, but as I got older, Entenmann’s lost its appeal and I all but forgot about its existence. Then, one day at work not too long ago, someone brought in a box of Entenmann’s donuts. I felt the excitement of my youth. I opened the box and smelled that familiar cakey, vanilla aroma. I took a bite into the waxy chocolate shell, and instantly remembered eating the same kind of donut, standing at the kitchen counter of my childhood home. My next thought was: “This is not quite as good as I remembered.” I looked at the list of ingredients: palm oil, soy, unpronounceable preservatives, food dye, corn syrup and other ingredients that never found their way into any bubbe’s kitchen.
I will always maintain a soft spot for Entenmann’s products, and I mean no hate towards them. But it occurred to me that I could capture some of the joy of my youth by making my own homemade version of my favorite flavor of Entenmann’s: the raspberry Danish twist.
Traditionally, Danishes are made with puff pastry, but Entenmann’s dough deviates from the norm. Instead of puff pastry with its flaky croissant-like texture, they use an enriched dough more akin to brioche. To get that waft of vanilla from the Danish, I use vanilla powder. I generally favor vanilla bean and vanilla extract, but there’s something about the powder that works here. Maybe it’s also because it reminds me of my grandmother; she put vanilla powder in all of her desserts, which made them taste different from anyone else’s cakes.
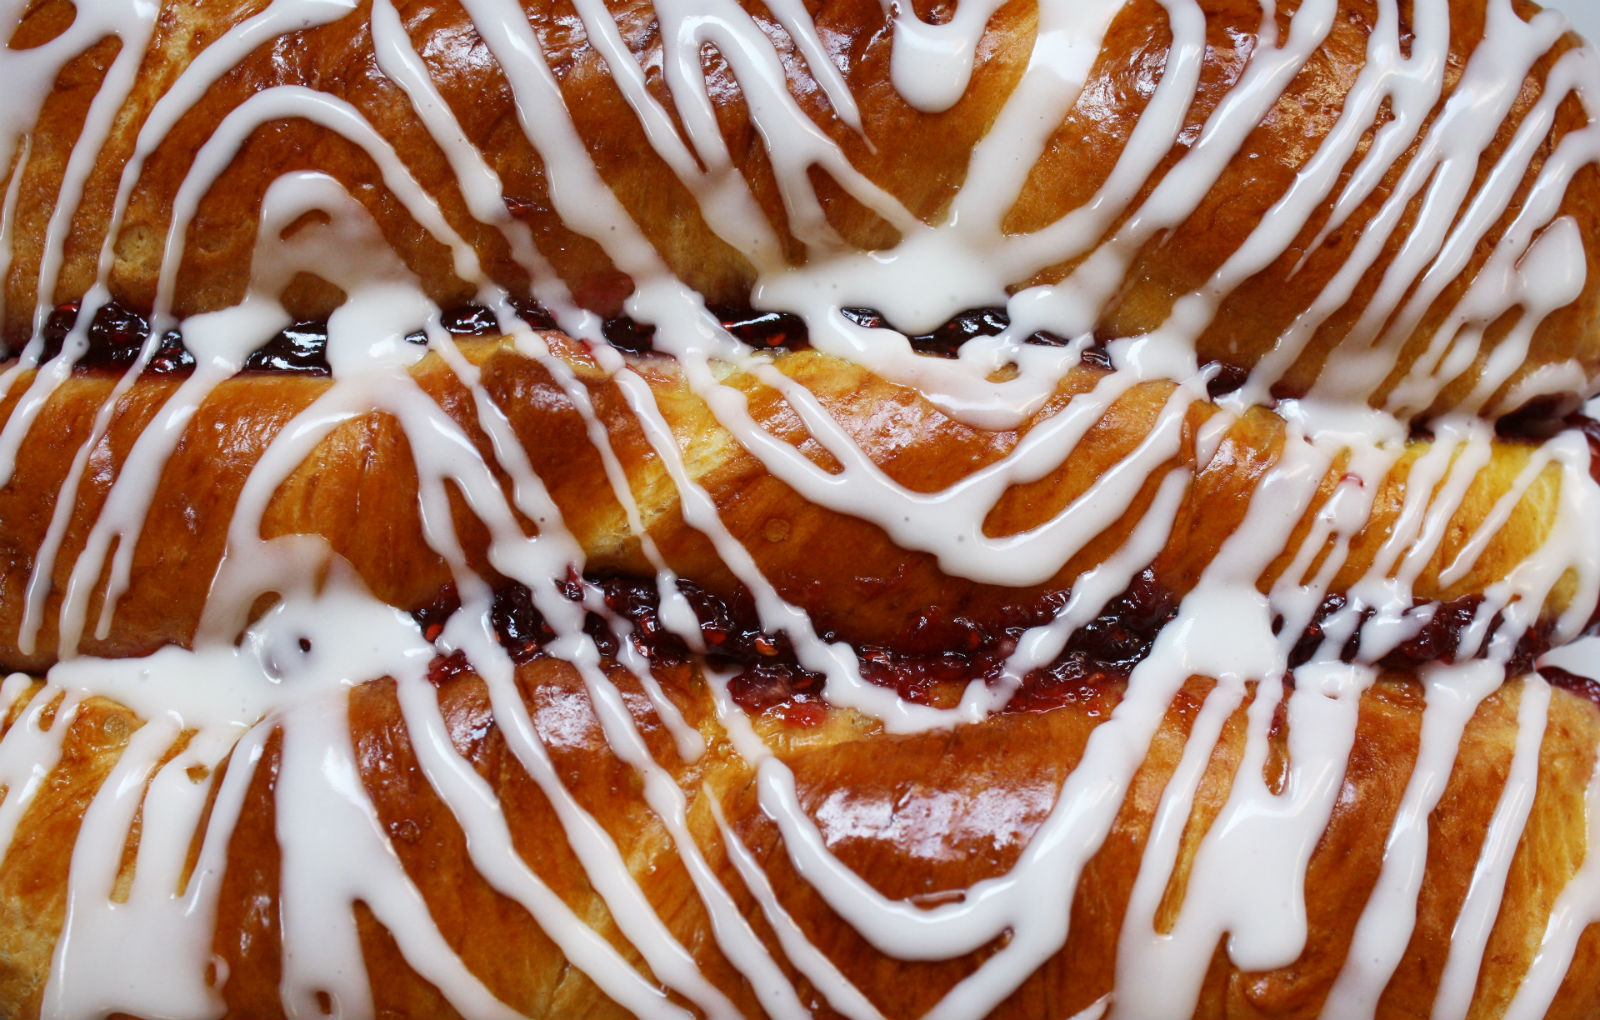
Once the dough is made and has risen, you form the Danish and fill it with good raspberry jam. After it has baked and cooled, you top it with a required layer of icing. You can really form this dough into a variety of shapes and sizes, but I prefer to keep mine Entenmann’s-sized: small and rectangular, with a good proportion of filling-to-cake ratio and a generous amount of icing. The only other things this needs is a cup of coffee to go with it — and some lively Jewish banter.
Notes:
- This recipe can be made 1 day ahead of time, rewarmed, and iced prior to eating. Keeps for 2 days in an airtight container at room temperature.
- This recipe makes two 8×6 Danishes, but you can freeze half the dough for future use (see Direction 6). Just allow it to defrost and come up to room temperature before continuing with the recipe.

Homemade Entenmann’s Raspberry Danish Twist
I will always maintain a soft spot for Entenmann’s products, but this homemade version of my favorite flavor of Entenmann’s, the raspberry Danish twist, is even better than the original.
- Total Time: 2 hours 30 minutes
- Yield: 2 pastries
Ingredients
For the Danish:
- 1 cup milk
- ⅓ cup sugar
- 1 packet (7 g) active rise yeast
- 3 cups (450 g) all-purpose flour, plus more for dusting or as needed
- 1 Tbsp vanilla powder or 1 vanilla bean (split, and seeds scraped out)
- 1 tsp kosher salt
- 2 large eggs, at room temperature
- ½ cup (1 stick) unsalted butter, cubed and at room temperature
- 1 cup raspberry jam
- 1 egg yolk plus one teaspoon of water, for the egg wash
For the icing:
- 1 cup sifted powdered sugar
- 1 ½ Tbsp milk or water
- 1 tsp vanilla powder or ½ tsp vanilla extract
Instructions
- Grease two 8×6 baking dishes and line with parchment paper. You can also make one large Danish in a 9×11 baking dish.
- Heat the milk until warm to the touch but not too hot, about 100°F. Add the sugar and active dry yeast to the milk, and allow the yeast to proof for 5-10 minutes. The yeast will get foamy and bubbly; if it doesn’t, your milk may have been too hot or too cold and it is best to start again.
- In the bowl of a stand mixer with a paddle attachment, combined the flour, salt and vanilla. Alternatively, you can make the dough by hand, you will just need to mix and knead for longer.
- Add the milk and yeast mixture to the dough, along with the two eggs. On medium, mix until a very shaggy dough is formed. Next, with the mixer still on medium, add the room temperature butter one cube at a time; allow each piece of butter to incorporate before adding the next. Once all of the butter is incorporated, the dough will appear smoother and stickier. Switch the paddle attachment for the dough hook, and mix on medium speed for 5-6 minutes, or until a soft, smooth, elastic dough is formed. It will start out looking very sticky and wet, but will ball around the dough hook toward the end. If it looks too wet and does not start forming a ball, you can add a few Tbsp flour to help with the consistency.
- Gently transfer the dough to a lightly greased bowl (it will be very soft and pour out), and cover it with a damp, clean kitchen towel. Allow the dough to rise until roughly doubled in size, 1-2 hours depending on the temperature in your kitchen.
- Once the dough has risen, punch it down and divide it in half. You can make two 8×6 raspberry Danish twists at this time, or freeze half the dough for future use (just allow it to defrost and come up to room temperature). Dust a clean surface with flour, then take one half of the dough and divide it into three equal balls. Roll each ball into a strand that is about an inch longer than the length of the baking dish, then gently twist each strand and fit them in lengthwise into the baking dish. Cover with a lightly damp clean kitchen towel, and let the dough rise again for another 15-20 minutes.
- Preheat the oven to 350°F. Add the jam to the danish.

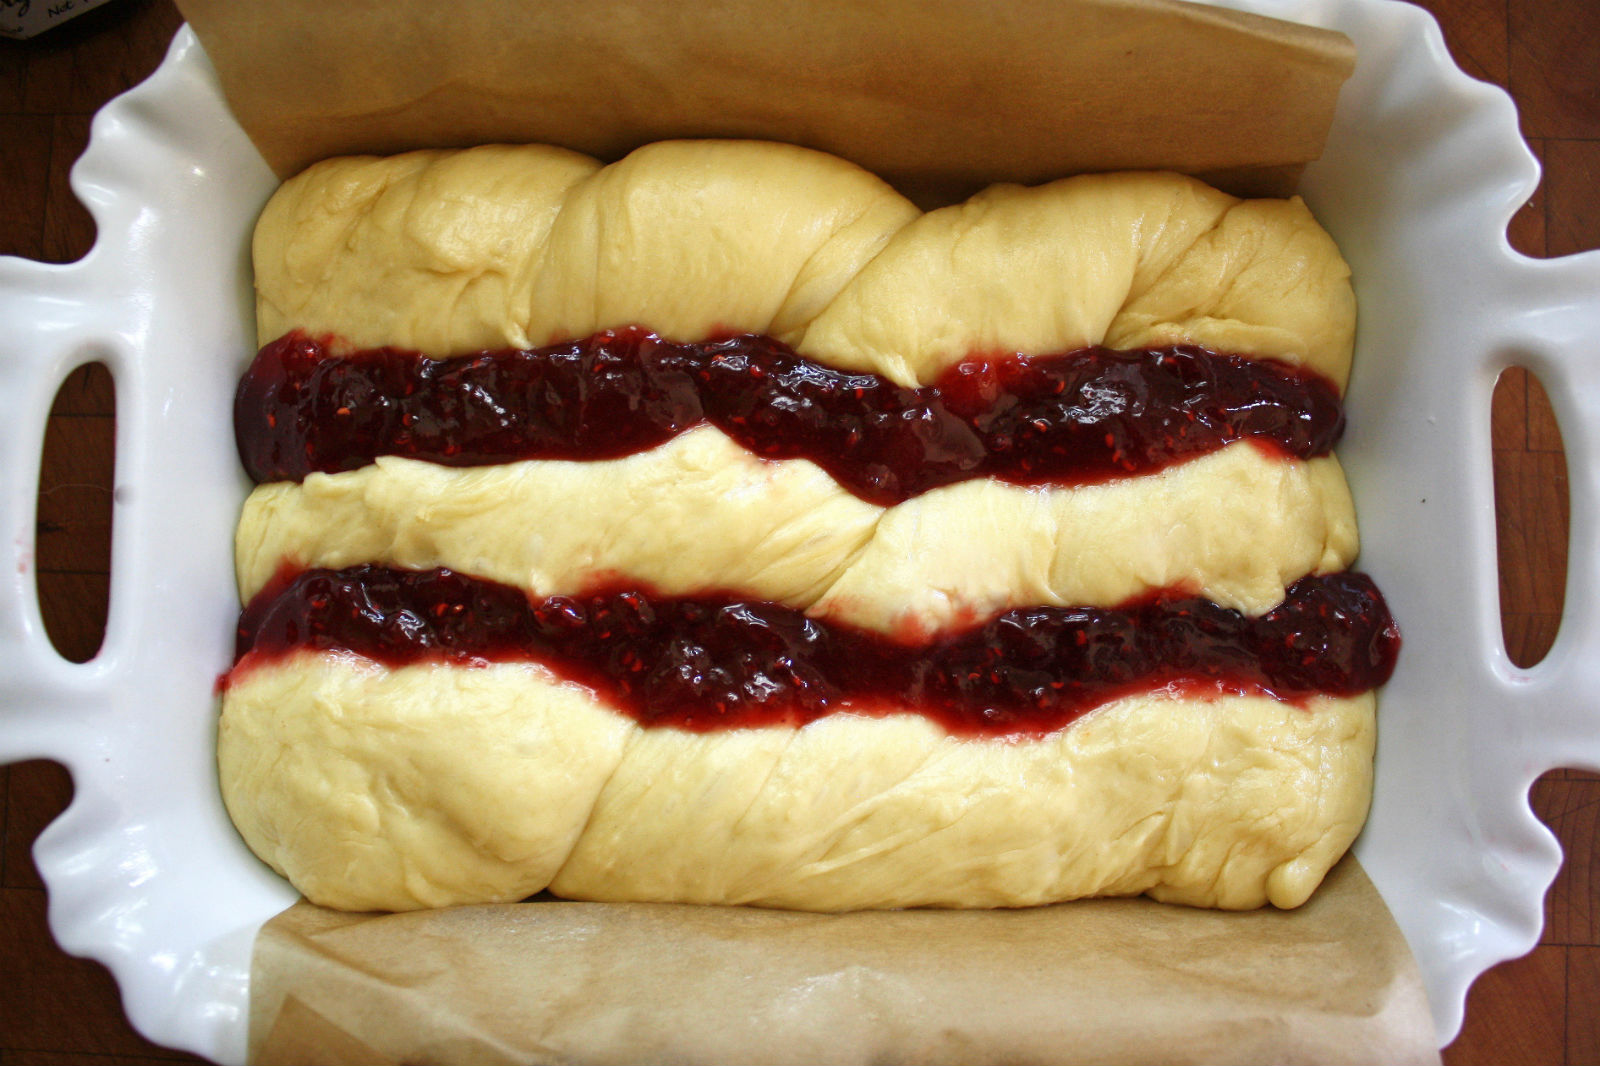
- Between the three strands of dough, you’ll make two strips of jam, each about a ¼ cup of worth of jam, or ½ a cup per danish (if using a larger dish, simply evenly add jam between each strand). I gently nudge the stands apart, and with a spoon, fill with jam between the strands. Brush the top of the dough with the egg wash. Bake for 25-30 minutes or until deep golden brown on top. Rotate once halfway through baking.
- Once baked, allow to cool on a rack. While the cakes are cooling make the icing. Once mostly cooled, you can ice the cakes by drizzling the icing freeform with a spoon, or you can fill a small Ziploc bag with the icing, and snip off a small piece of the corner to ice in any design you prefer.
Notes
- This recipe can be made 1 day ahead of time, rewarmed, and iced prior to eating. Keeps for 2 days in an airtight container at room temperature.
- This recipe makes two 8×6 Danishes, but you can freeze half the dough for future use (see Direction 6). Just allow it to defrost and come up to room temperature before continuing with the recipe.
- Prep Time: 2 hours
- Cook Time: 30 minutes
- Category: Dessert
- Method: Baking
- Cuisine: North American
Directions
- Grease two 8 x 6 baking dishes and line with parchment paper. You can also make one large danish in a 9 x 11 baking dish.
- Heat the milk until warm to the touch but not too hot, about 100°F. Add the sugar and active dry yeast to the milk, and allow the yeast to proof for 5-10 minutes. The yeast will get foamy and bubbly, if it doesn’t, your milk may have been too hot or too cold and it is best to start again.
- In the bowl of a stand mixer with a paddle attachment, combined the flour, salt, and vanilla powder. Alternatively, you can make the dough by hand, you will just need to mix and knead for longer.
- Add the milk and yeast mixture to the dough, along with the two eggs. On medium, mix until a very shaggy dough is formed. Next, with the mixer still on medium, add the room temperature butter one cube at a time; allow each piece of butter to incorporate before adding the next. Once all of the butter is incorporated, the dough will appear smoother and stickier. Switch the paddle attachment for the dough hook, and mix on medium speed for 5-6 minutes, or until a soft, smooth, elastic dough is formed. It will start out looking very sticky and wet, but will ball around the dough hook towards the end. If it looks too wet and does not start forming a ball, you can add a few tablespoons of flour to help with the consistency.
- Gently transfer the dough to a lightly greased bowl (it will be very soft and pour out), and cover it with a damp clean kitchen towel. Allow the dough to rise until roughly doubled in size,1-2 hours, depending on the temperature in your kitchen.
- Once the dough has risen, punch it down and divide it in half. You can make two 8 x 6 raspberry danish twists at this time, or freeze half the dough for future use (just allow it to defrost and come up to room temperature). Dust a clean surface with flour, then take one half of the dough and divide it into three equal balls. Roll each ball into a strand that is about an inch longer than the length of the baking dish, then gently twist each strand and fit them in lengthwise into the baking dish. Cover with a lightly damp clean kitchen towel, and let the dough rise again for another 15-20 minutes.
- Preheat the oven to 350°F. Add the jam to the danish.

- Between the 3 strands of dough, you’ll make two strips of jam, each about a ¼ cup of worth of jam, or ½ a cup per danish (if using a larger dish, simply evenly add jam between each strand). I gently nudge the stands apart, and with a spoon, fill with jam between the strands. Brush the top of the dough with the egg wash. Bake for 25-30 minutes or until deep golden brown on top. Rotate once halfway through baking.
- Once baked, allow to cool on a rack. While the cakes are cooling make the icing. Once mostly cooled, you can ice the cakes by drizzling the icing free form with a spoon, or you can fill a small ziplock back with the icing, and snip off a small piece of the corner to ice in any design you prefer.


Leave a Comment