For more Hanukkah recipes, click here and here!
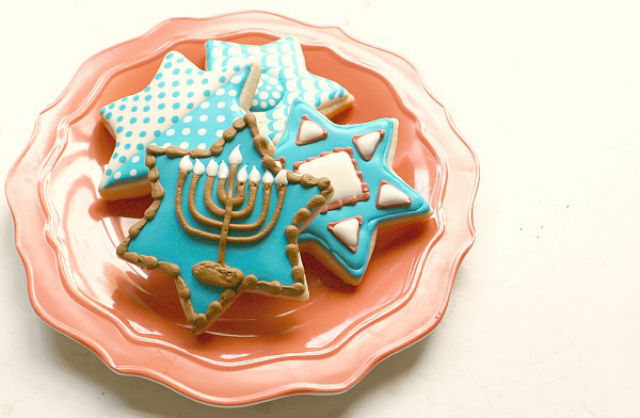
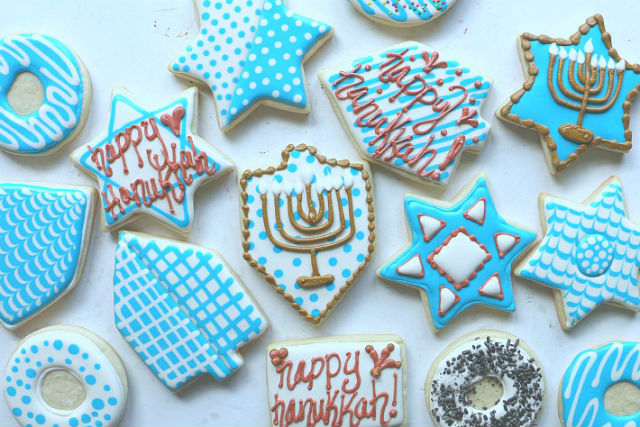
Hanukkah is all about the latkes, sufganiyot and all the other delicious fried foods we are invited to enjoy. But the holiday also falls at a time of year when decorated cookies abound, and who says we shouldn’t also enjoy some beautiful dreidel, menorah and donut cookies!?
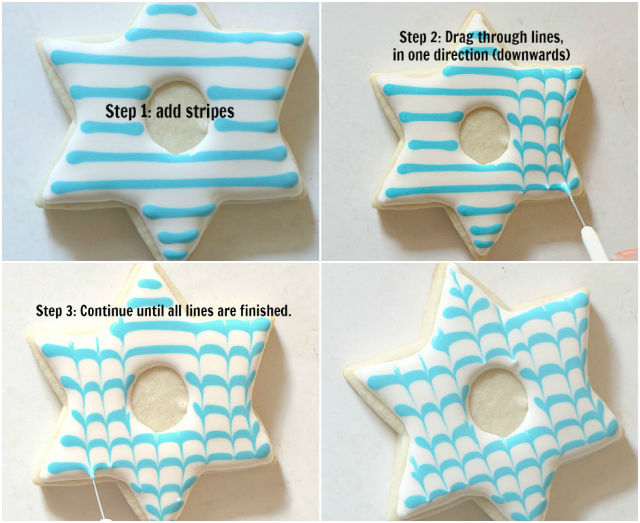
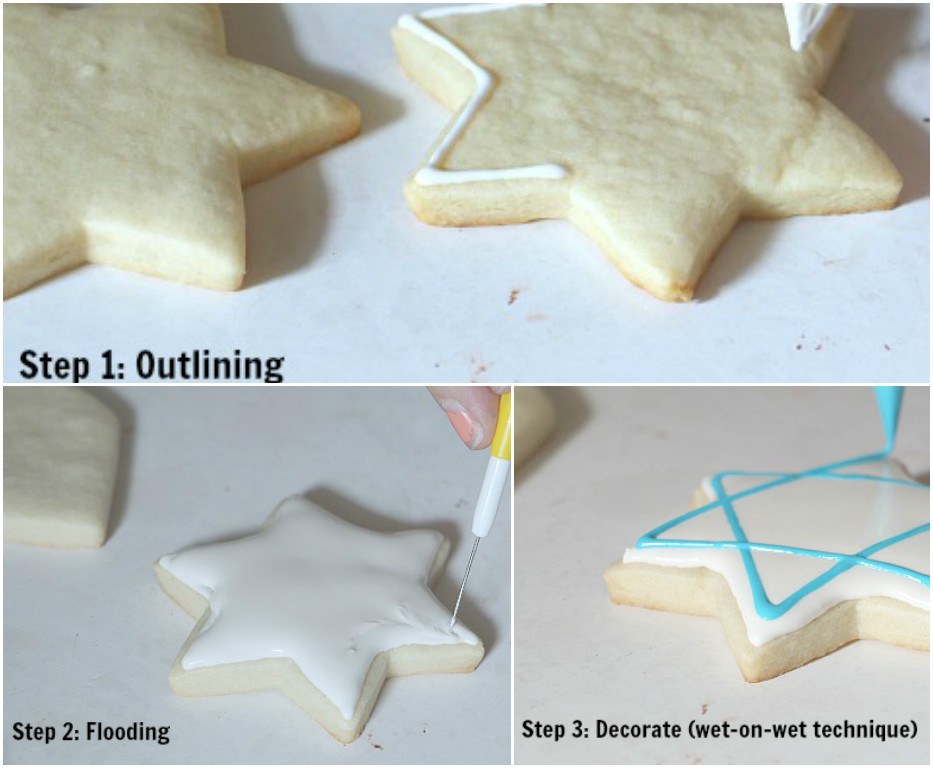
Decorating cookies can seem daunting, but I hope this basic tutorial will serve as a starting to point for beautiful cookie techniques you can use all year.
Let me preface – if this is your first time decorating and you are not pleased with the results, don’t be deterred from trying again! Baking and decorating relies so much on practice, so just take your time and keep at it.
The Nosher celebrates the traditions and recipes that have brought Jews together for centuries. Donate today to keep The Nosher's stories and recipes accessible to all.
What you will need to start decorating:
- a stand mixer
- sheet pan(s) to hold the cookies
- scribe tool (in a pinch you can also use a toothpick)
- colored icing in bags/ piping tips if using
- damp paper towel
- a small fan (a fan will help speed drying time and leaves a shiny surface)
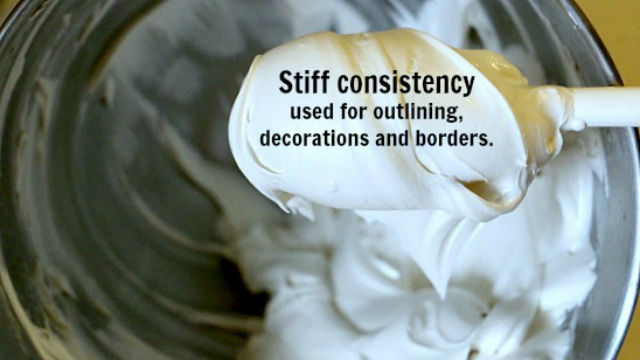
You will also need a large batch of royal icing (see recipe below) I mix my icing until it is a stiff consistency (can hold a peak) like in the picture below. This way, I can add my own amounts of water to make it looser for filling/ flooding the cookies. It is much easier to change consistency from stiff to loose. If it is too loose, you have to start over. Stiff consistency icing is perfect for piping words and outlines.
Once the icing is stiff, place it in a large pyrex bowl and cover with plastic until you are ready to color the icing. Always keep your icing covered or it will form a crust and then you won’t be able to use it.
Tips for coloring icing: start with a very small amount of color and add small drops of water to the consistency you desire. Keep in mind that a little color goes a long way and darkens after time. To achieve dark colors like black or red, make a paste with a half teaspoon of sifted cocoa powder and a drop of water with the color. If you are making a lot of icing, use more cocoa powder. Mix in a small amount of the royal icing to combine. Let sit room temperature covered for a day to see if the color darkens. If you don’t do this, you will end up adding an entire bottle of food coloring, the icing will be bitter, and the color might still be too light.
In order to make the icing loose to the flooding consistency, add drops of water and mix to desired consistency. To assure that you aren’t adding too much water, use a spray bottle. For flooding consistency, drag the spatula into the icing. If the icing takes 14 seconds to smooth itself out, it is perfect to flood (fill in) your cookie. Be careful not too add too much water, but if you do add more of the stiff icing and mix to combine.
Leave the cookies to dry overnight. Once dry to the touch, wrap tightly in a plastic bag or cellophane bags and tie with a ribbon. You can freeze the cookies wrapped as well. The extra royal icing can be stored wrapped in plastic refrigerated for a week, though it is best to use immediately as the color tends to separate after a day (mix before using).
There is an endless world of cookie decorating and this is just the beginning.
Basic Sugar Cookie, Recipe by Alton Brown, yields 2 dozen
Tips: I recommend if baking non-dairy cookies, use Earth Balance sticks rather than margarine. This recipe is easily doubled and you can freeze plastic wrapped cookie dough for up to three months. Bake the cookies the day before decorating to ensure that the cookies have cooled and the “butter” has settled into the dough. Decorating cookies the same day risks a butter leakage and the icing will become a darker tint.
INGREDIENTS
3 cups of all-purpose flour, sifted
3/4 teaspoon of baking powder (sift with flour)
1/4 teaspoon salt (omit if using Earth Balance)
1 egg, beaten
1 Tbsp milk or vanilla almond milk
1 cup butter (two sticks) left out of fridge for 30 min. to soften
1 cup of sugar
DIRECTIONS
In a kitchen-aid mixer fitted with paddle attachment, beat the softened butter until fluffy- approx. 1-2 minutes and don’t over mix, or your cookies will have a slight dome when baked. Scrape down the bowl, add the sugar.
Mix until combined. Scrape down, add the egg and milk. Mix until combined and scrape again. Add the flour while mixer is on low. Mix until dough comes together. Don’t over mix.
Place half of the cookie dough in plastic wrap, flatten into a round disk, and refrigerate for at least 2 hours or overnight.
When ready to bake, preheat oven to 375 degrees.
Place parchment paper on two baking sheets and have a place in your fridge or freezer that you can place the sheets to chill dough after the shapes are cut.
On a non-stick mat or parchment paper, dusted with powdered sugar (not flour), roll the dough to desired thickness. Cut with cutter of choice and place on baking sheet.
Freeze or refrigerate for several minutes to ensure dough is cold. Place in oven for 8-10 minutes rotate in between. When cookies begin to brown on bottom, they are ready.
Leave on baking sheet for 2 minutes, carefully place on cooling rack. Once cooled, cookies can be stored in an airtight container or plastic bag at room temperature for a week, or frozen for up to three months.
Basic Royal Icing Recipe
INGREDIENTS
1 Tbsp vanilla extract
2 3/4-3 Tbspmeringue powder
4 cups of powdered sugar
1/4 cup of water (plus more gradually if needed)
DIRECTIONS
Clean mixer and attachments and make sure there is no butter or grease inside. Place all ingredients in bowl except for the water. Using the paddle attachment, beat ingredients on a low speed, gradually adding water.
Start with 1/4 cup and be very careful not too add much more. If you’re icing seems too thick, add a little more water. Scrape down icing to make sure it is incorporated. Wash spatula in between uses so no crust of the icing forms.
Beat for 5-8 minutes until it holds a stiff peak.
Transfer to pyrex bowl and cover with plastic until ready to use.
Love Jewish food? Sign up for our weekly Nosher recipe newsletter!
Hanukkah
Pronounced: KHAH-nuh-kah, also ha-new-KAH, an eight-day festival commemorating the Maccabees' victory over the Greeks and subsequent rededication of the temple. Falls in the Hebrew month of Kislev, which usually corresponds with December.
menorah
Pronounced: muh-NOHR-uh, Origin: Hebrew, a lamp or candelabra, often used to refer to the Hanukkah menorah, or Hanukkiah.
